

How to Hide a Cat Litter Box in Your Living Room

Table of Contents
- How to Hide a Cat Litter Box in Your Living Room: Start With Placement
- Hidden Litter Box Furniture: What to Look For
- DIY Litter Box Enclosure: Step-by-Step Build Guide
- How to Hide a Litter Box Without a Box
- Litter Box Odor Control and Ventilation
- Helping Your Cat Adjust to a Concealed Litter Box
- Common Mistakes When Hiding a Cat Litter Box
- Conclusion
- Frequently Asked Questions
Last Updated: October 5, 2026
How to Hide a Cat Litter Box in Your Living Room: Start With Placement
Learning how to hide cat litter box setups in your living room starts with one question: where does your cat actually want to go? At Blanco's Pet Store, we offer carefully selected items to help pet parents turn awkward corners into spaces that work for both the household and the cat.

Most guides jump straight to furniture. That's backwards: placement decides the furniture you buy, the size you need, and how easy cleaning will be.
The Worst Spots for a Litter Box
Skip these spots first:
- Next to a heating vent or radiator, where heat traps odor
- Beside a washing machine or furnace, which can scare cats mid-use
- In a dead-end corner with one exit, which traps cats and smells
A cat that feels trapped will stop using the box, a bigger problem than looks.
The Best Spots That Still Work for Your Cat
The best living room spots offer two escape routes, low traffic, and good airflow:
- A corner beside a sofa, with a gap behind it
- The space under a console table against an interior wall
- A nook near a window that opens
Cats want quiet and privacy, not total isolation. A spot where they can see the room but stay partly hidden works best.
Hidden Litter Box Furniture: What to Look For
Hidden litter box furniture is any enclosed piece that holds a litter box inside and blends into your room. It hides the box, litter, and smell while giving your cat a private hideaway, and good pieces look like normal furniture and open for cleaning.
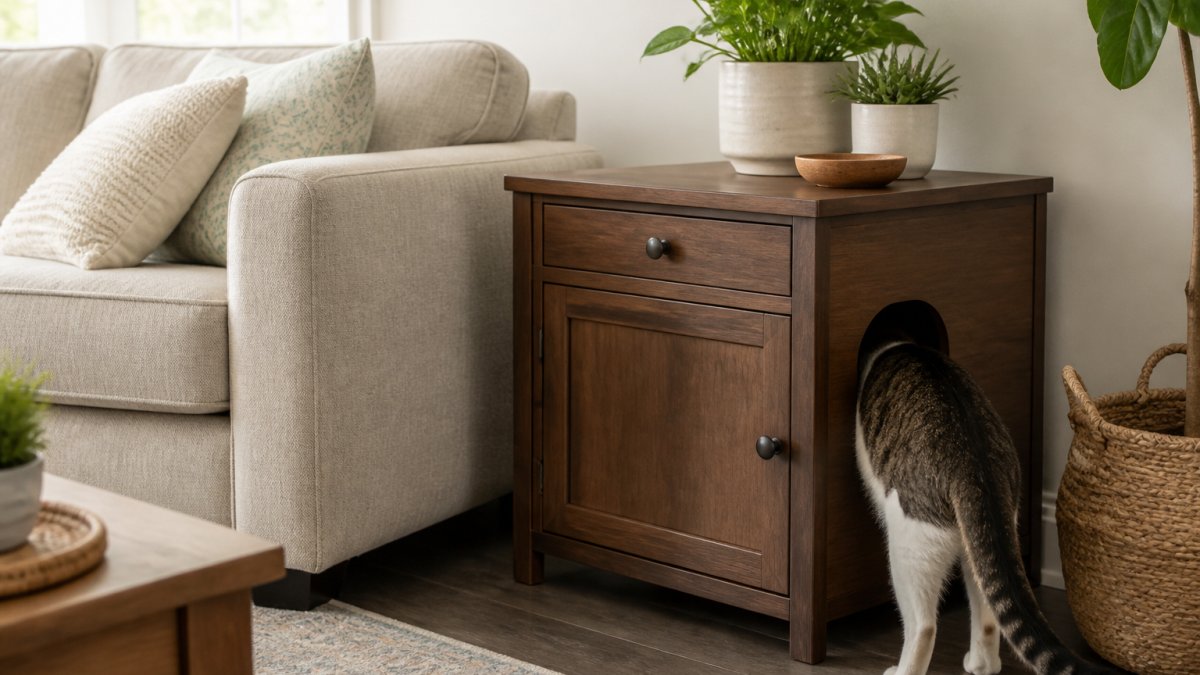
Here's what matters when you shop:
- Entry opening: 6 to 8 inches wide is enough for most cats. Senior cats need a lower entry, closer to the floor.
- Interior space: Big enough for the box plus 2 to 3 inches on each side.
- Cleaning access: A door or removable top. If you can't reach the box easily, you'll skip scooping.
Sizing Your Enclosure Correctly
Measure your litter box first, then add room. A standard box runs about 18 by 24 inches; add 2 to 3 inches per side for an interior of roughly 24 by 30 inches.
If you're not building, our Enclosed Litter Box with Scoop and Lid Anti-Splashing is a simple starting point. Pair it with a Heavy Duty Waterproof Large Cat Litter Mat at the entry to catch tracked litter.

DIY Litter Box Enclosure: Step-by-Step Build Guide
A DIY litter box enclosure is a weekend-morning project: most people finish in two to three hours with basic tools. Use a thrift-store dresser, low cabinet, end table, or storage bench with a door or lift-off top so you can reach the tray without moving the piece.
Measure Before You Cut
Measure the litter box, then measure your cat. A standard uncovered box runs about 18 by 24 inches, but large and high-sided boxes run closer to 24 by 30. Add 2 to 3 inches of clearance per side so your cat can turn around, and 4 to 6 inches of headroom so it can stand and dig.
Write the numbers on the cabinet in pencil before you touch a saw. The cutout is the one step you cannot undo.
Tools and Materials
- Used cabinet, dresser, end table, or storage bench
- Jigsaw with a fine-tooth wood blade (or a hole saw for round openings)
- Litter mat
Step-by-Step
- Empty and inspect the base. Remove drawers or shelves. Check for staples, loose veneer, or crumbling particle board. Solid wood or plywood holds up best; unfinished particle board soaks up odor and swells.
- Mark the entry. Trace the opening on the side panel with painter's tape so the jigsaw has a clean line. Keep the bottom edge 1 to 2 inches above the floor for a standard cat, or flush with the floor for a senior cat.
- Cut the opening. Drill a starter hole inside the tape line, then cut with the jigsaw. Go slow at the corners. Sand the edges with 120 grit, then 220.
- Seal the interior. Paint or line every interior surface, including the cabinet floor. This is the step most people skip, and the reason their enclosure smells within a month. Let it cure fully before the cat goes in.
- Add ventilation. Drill a row of 1/2-inch holes near the top of the back panel, spaced about 2 inches apart, or leave the back panel partly open with a 1-inch gap. Air needs to move up and out, not just in.
- Reinforce the opening if needed. On thin panels, screw a 1x2 furring strip along the inside edge of the cutout to keep it from flexing.
- Install the latch. A magnetic catch keeps the door shut; a child-safety latch keeps it from swinging open when your cat pushes out.
- Fit the mat and box. Place a litter mat just inside the entry, then set the box on top. Check that the door closes without hitting the box.
- Test with the cat. Leave the door open for the first few days. Hesitation at the entry usually means the opening is too small or the interior too dark.
Total time: 2 to 3 hours, plus cure time for paint or sealer. Difficulty: beginner to intermediate. Expected result: a piece that reads as furniture, not as a litter box.
How to Hide a Litter Box Without a Box
You don't need to buy or build furniture to hide a litter box. Simple tricks work well for renters and small rooms:
Enclosed Litter Box with Scoop and Lid Anti-Splashing →
- Screen it with a folding room divider or a tall plant.
- Tuck it behind a sofa or armchair, leaving a clear path for your cat.
- Slide it under a console table with a low shelf.
These options cost little and take minutes. The trade-off is less odor control, so scoop daily and refresh litter often.
Litter Box Odor Control and Ventilation
Odor in a hidden litter box is an airflow problem before it is a cleaning problem. Ammonia is heavier than air and sinks, so a sealed cabinet holds a layer of it right where your cat breathes. The fix is a path for air to enter low and exit high: a gap at the bottom of the door plus vents near the top of the back panel.
What Actually Controls Odor
- Litter depth. Two to three inches of clumping litter lets urine form a scoopable clump instead of spreading to the bottom. Shallower litter means a wet floor and stronger smell.
- Box size. A box that is too small forces your cat to stand in soiled litter. The rule is a box about 1.5 times the length of your cat, nose to base of tail.
- Scooping frequency. Twice a day in a multi-cat home, once a day for a single cat. Clumps left in the box keep releasing odor.
Ventilation Options for an Enclosed Box
- Passive vents: drill holes or cut slats in the cabinet. Free, quiet, and enough for most single-cat homes.
- A small USB fan mounted at the top vent pulling air out. Inexpensive and effective in a closed cabinet.
- A carbon filter pad taped over the exhaust vent. It reduces odor without blocking airflow.
Avoid placing the enclosure against a heating vent, radiator, or in direct sun. Heat speeds up the bacteria that produce odor.
Litter Tracking in a Shared Room
Tracking is the other half of the odor problem, because granules carry urine out of the box. A textured mat at the entry catches most of it, look for a raised lip or two-layer design, where the top traps granules and the bottom holds them until you dump it. Shake it daily and rinse it monthly. One mat just inside the entry catches litter before it reaches the door; a second outside catches what the cat kicks out.
A Simple Weekly Routine
- Daily: scoop once or twice, shake the mat, spot-check the enclosure for moisture.
- Weekly: top off litter, wipe the interior walls with a pet-safe wipe, check that vents are not blocked by the box or the mat.
- Monthly: wash the box and the mat, replace carbon filter pads, inspect the enclosure for soft spots or swelling.
If odor lingers after this routine, the problem is usually airflow, not cleaning. Add a vent, lower the entry gap, or move the box out of a dead-end corner.
Helping Your Cat Adjust to a Concealed Litter Box
Cats hate sudden change. Move the box into its new home over a week, not overnight: place the enclosure near the old spot with the box inside and the door open, and let your cat explore on its own.
Then:
- Leave the door off for the first few days
- Add the door once your cat uses the box without pause
- Keep the old box nearby for a week as backup
If your cat stops using it, the entry is likely too small or the space too dark. As the American Society for the Prevention of Cruelty to Animals notes, litter box problems are one of the top reasons cats are surrendered, so fix issues fast.
Common Mistakes When Hiding a Cat Litter Box
Most hidden litter box failures come down to a few repeat mistakes:
| Mistake | Why It Fails | The Fix |
|---|---|---|
| Sealed cabinet, no vents | Traps odor, cat refuses entry | Add vents or a back gap |
| Entry too small or high | Senior cats can't get in | Lower and widen the opening |
| No cleaning access | You skip scooping | Pick a door or lift-off top |
| Box too cramped inside | Cat can't turn around | Leave 2-3 inches per side |
| Placed in a dead-end corner | Cat feels trapped | Give two escape routes |
Conclusion
Hiding a litter box in your living room is about matching the setup to your cat's habits, not just your decor. Get placement right, add airflow, and keep cleaning easy, and the box disappears into the room. At Blanco's Pet Store, we carry the pieces that make this simple, from enclosed boxes and self-cleaning units to waterproof mats that stop tracking at the door.

Frequently Asked Questions
What furniture can you use to hide a litter box in a living room?
End tables, small dressers, benches, and cabinets with doors all work well. Look for pieces with a side or back opening at least 8 inches wide so your cat can enter comfortably. The enclosure needs to be large enough for your cat to stand, turn around, and dig. A cabinet or end table with a removable back panel makes cleaning easier. Measure your litter box first, then add 4 to 6 inches of clearance on each side before choosing furniture.
How do you keep a hidden litter box from smelling?
Ventilation is the biggest factor. Drill 1-inch holes in the back or sides of enclosed furniture to let air move through. Use a covered box with a carbon filter, scoop daily, and replace litter weekly. A waterproof litter mat under the box catches tracking and makes cleanup faster. For deeper odor control, place a small activated charcoal pouch inside the enclosure and swap it monthly. Avoid airtight enclosures, which trap ammonia and make odor worse over time.
How much space should a cat have to enter and turn around in a hidden litter box?
Your cat needs an entry opening at least 8 inches wide and 8 inches tall. Inside the enclosure, the litter box itself should be 1.5 times your cat's body length. For most adult cats, that means a box at least 18 inches long. Leave 3 to 4 inches of clearance around the box so your cat can circle it. If the space feels tight to you, it will feel tighter to your cat, and they may avoid it entirely.
How can you help a cat adjust to a covered or concealed litter box?
Start by leaving the enclosure door or lid open for the first week. Place your cat's current litter box inside the new spot without the cover, and let them explore. Keep the same litter they already use. If your cat avoids the new setup, move the old box next to the enclosure for a few days, then remove it once they use the new one consistently. Never force a cat into a concealed box. If they refuse after two weeks, try a different enclosure style with a wider opening.
Hiding a litter box well takes the right furniture, airflow, and a setup your cat actually uses. Blanco's Pet Store offers carefully selected essentials, including enclosed litter boxes, self-cleaning units, and waterproof mats, to make that job easier. Our team supports pets through every stage, from playful kittens to senior cats who need a lower entry. Get started with Blanco's Pet Store and give your cat a private spot that blends right into your home.